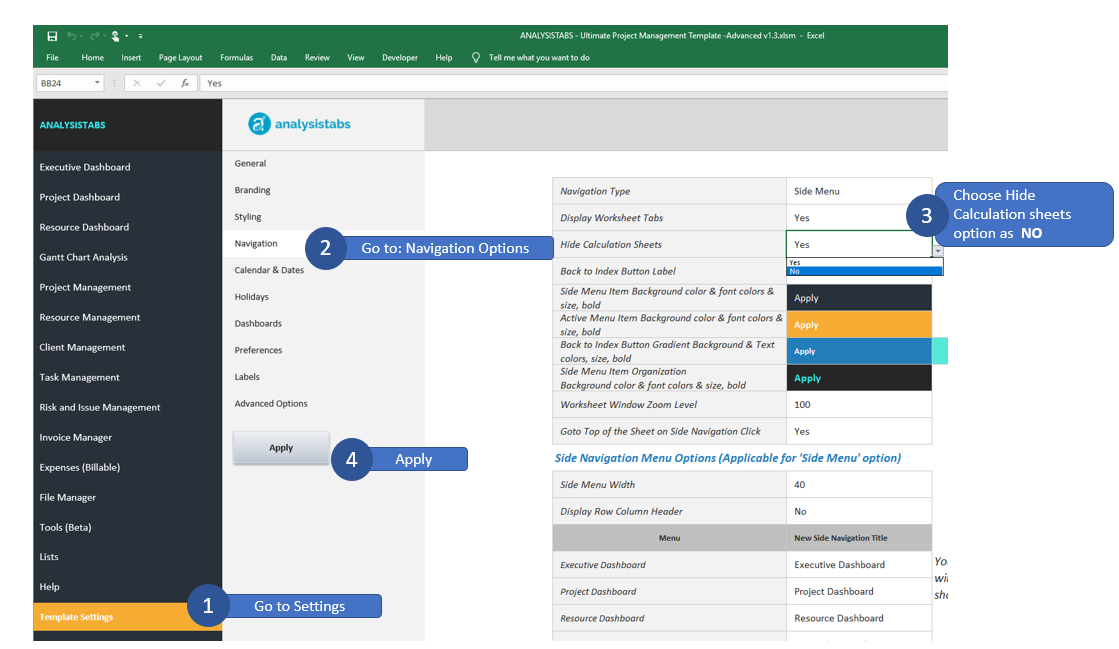
You can unhide the calculation sheets form settings. Please follow the below steps to hide/unhode sheets.
- Goto Settings
- Goto Navigation Options
- Choose Hide Calculation sheets option as NO
- And Apply the settings
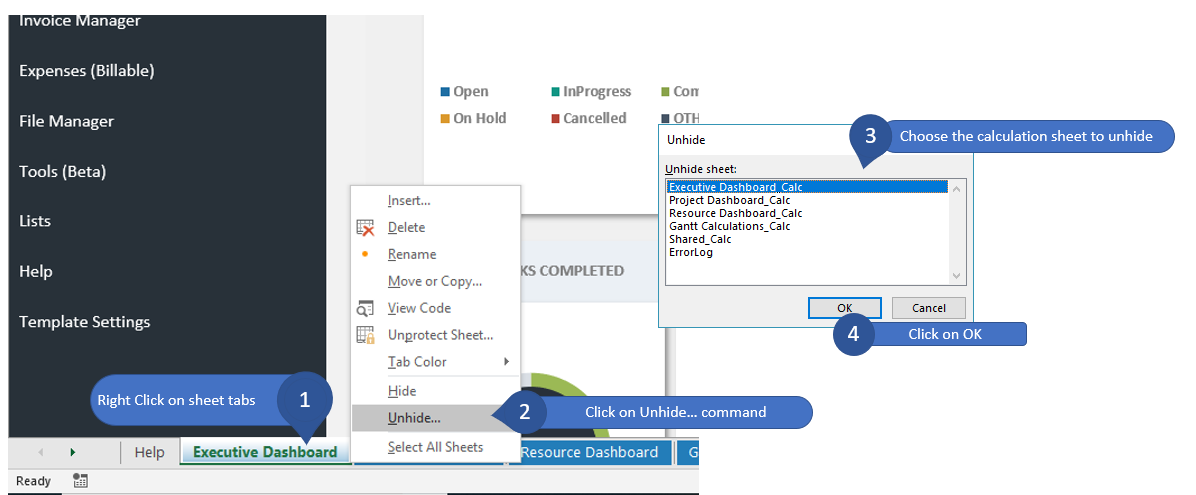
Alternatively, you can unhide calculation sheets as shown below:
- Right Click on the Sheet tabs
- click on the Unhide command
- Choose choose the sheet to unhide
- And press OK
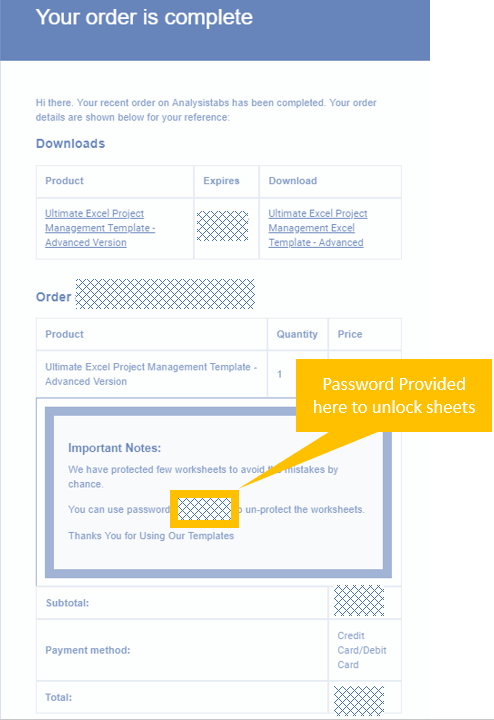
We have protected the sheets with password to avoid the mistakes by chance. You can unlock the sheets using the password provided in your complete order email.
Password in your order Complete email:
Use the password to unlock sheets:
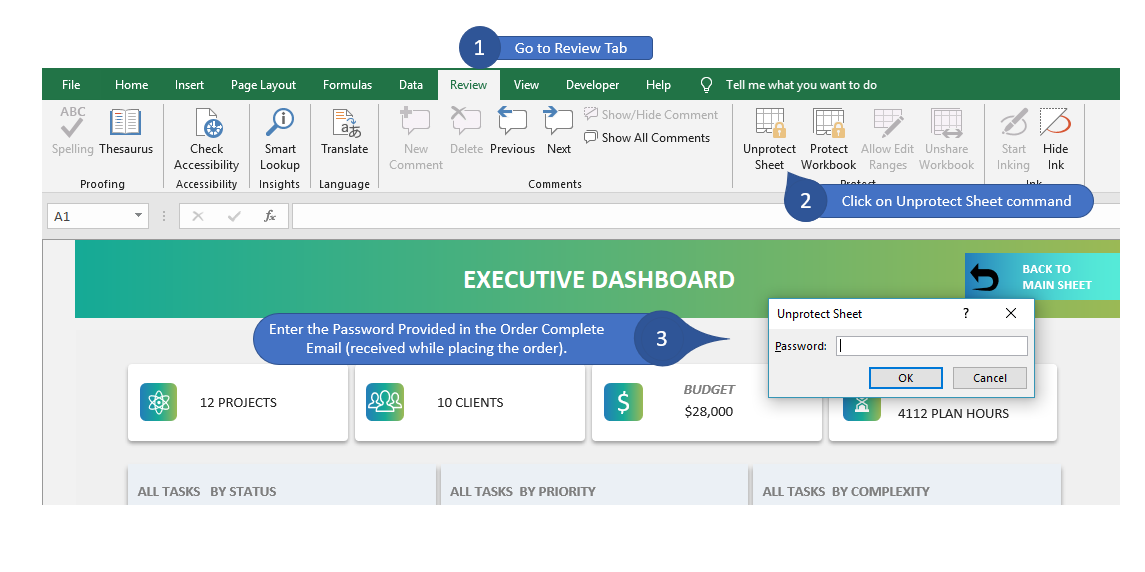
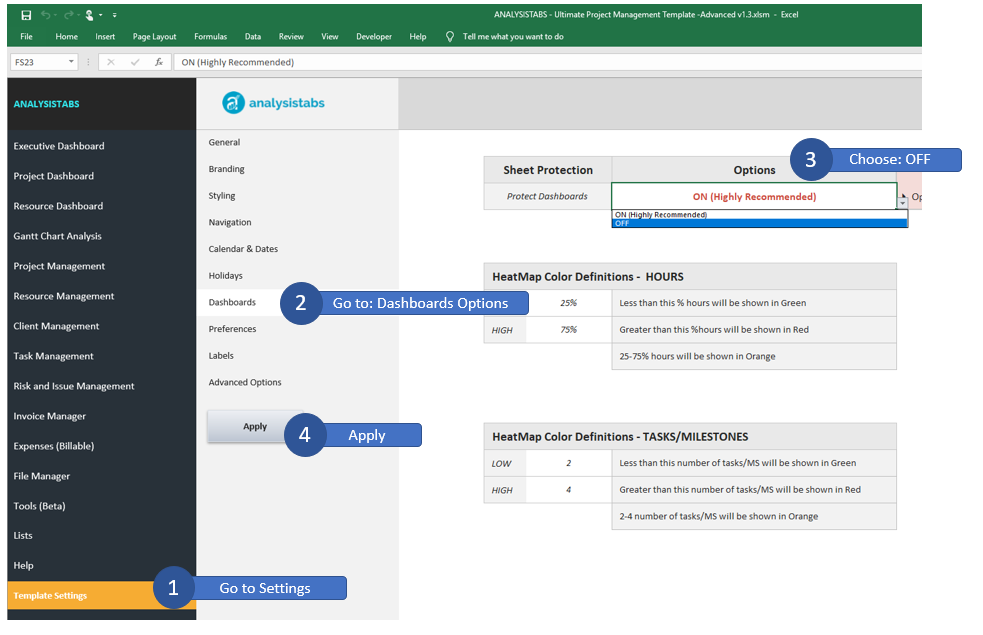
You can also unlock the dashboard sheets from the settings. Please follow the below steps to unlock the sheets.
- Goto Settings
- Goto Dashboards Options
- Change Protect Dashboards option as OFF
- And Apply the settings
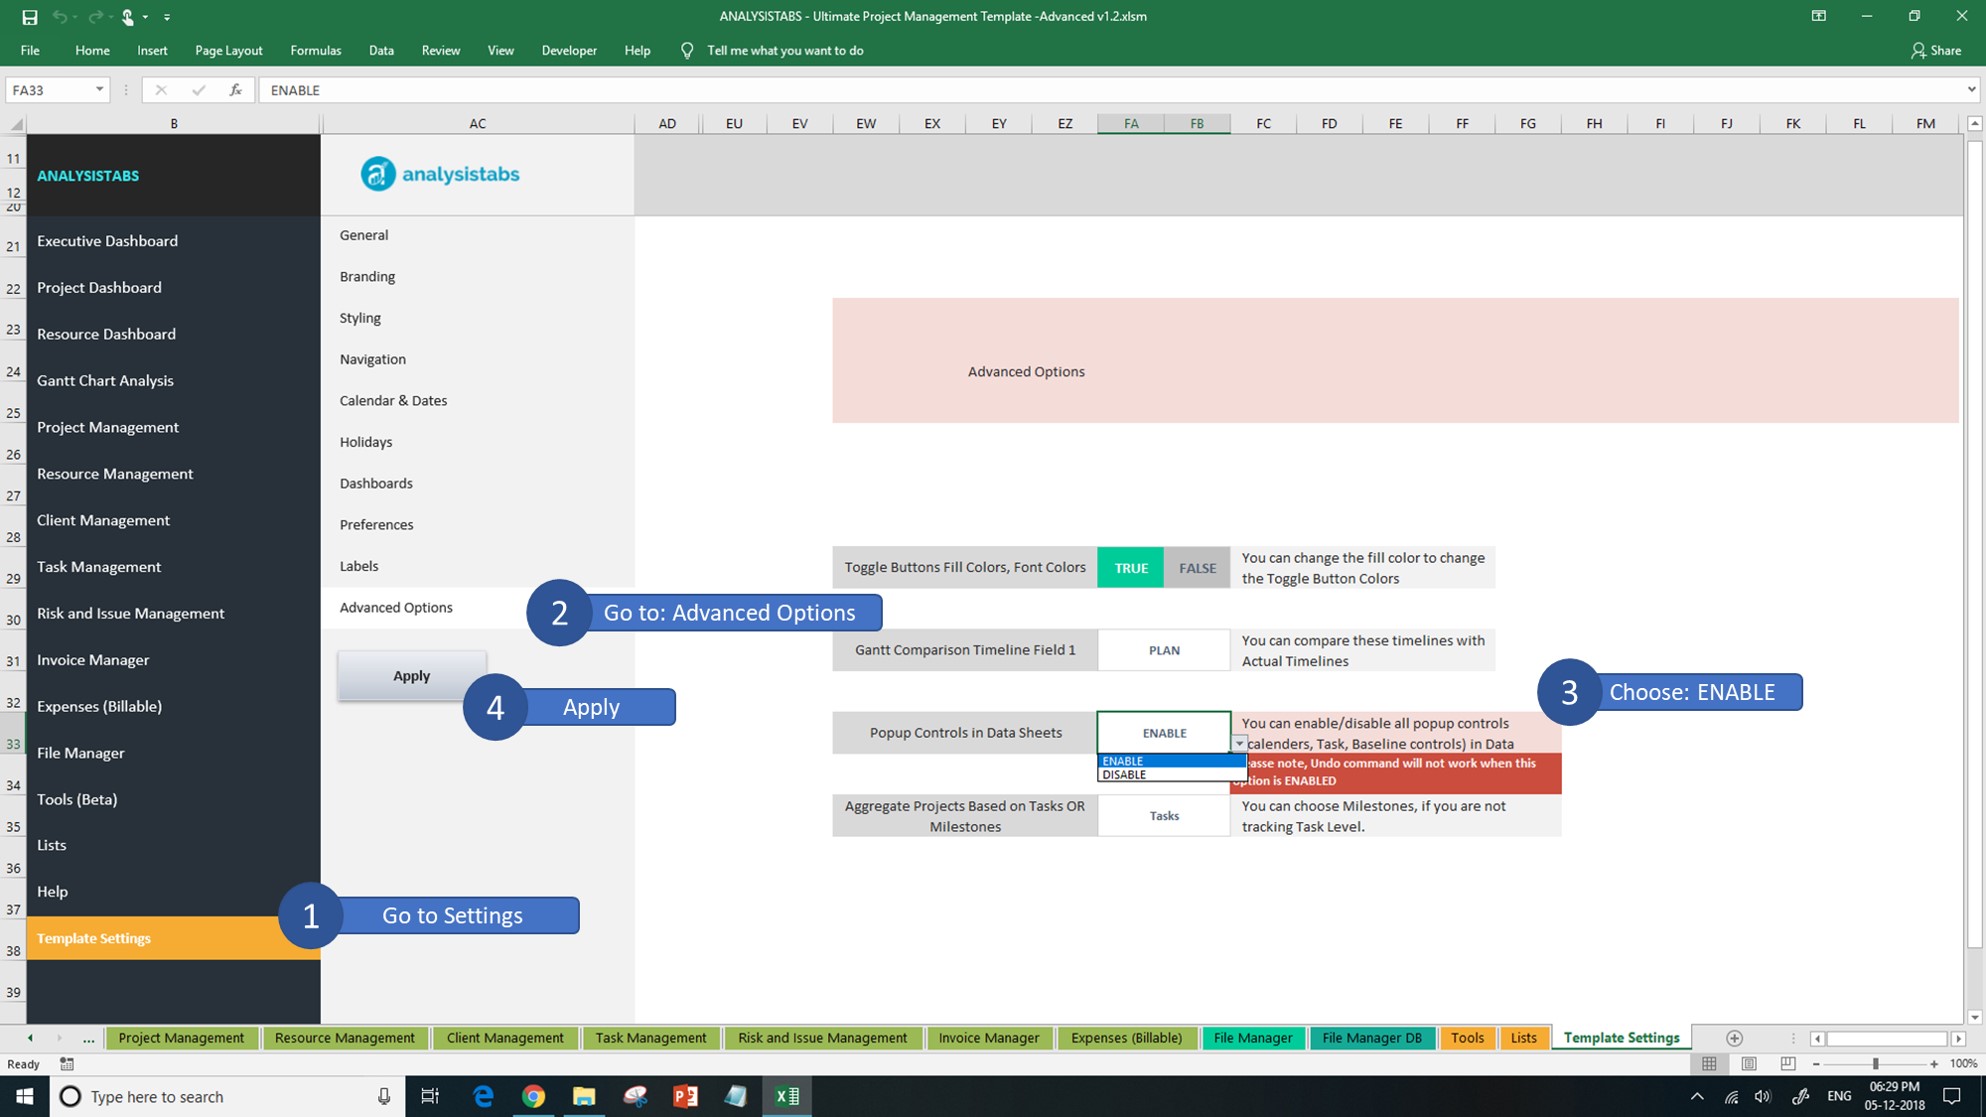
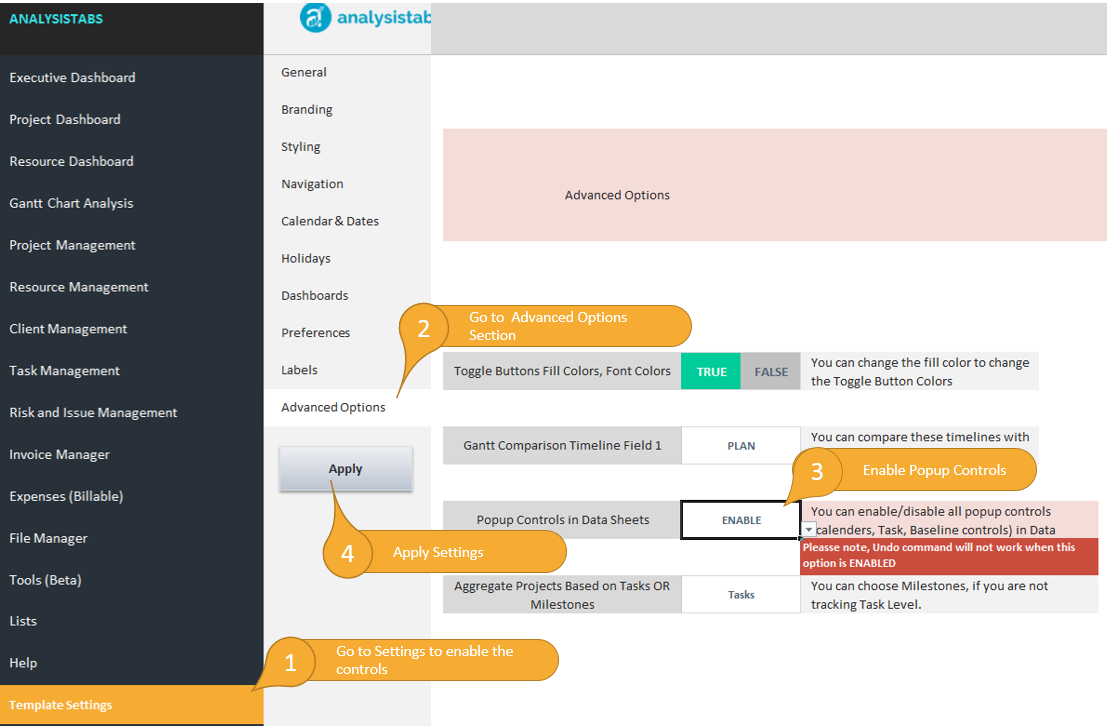
All Popou controls have been desabled by default. You can enable it from Settings. Please follow the below steps to enable/disable all popup controls (calenders, Task, Baseline controls) in Data sheets.
Pleasse note, Undo command will not work in the data sheets when this option is ENABLED.
- Goto Settings
- Goto Advanced Options
- Select the Popup Controls in Datasheets option as ENABLE
- And Apply the settings
Please see the below screen-shot for pictorial representation of the above settings:
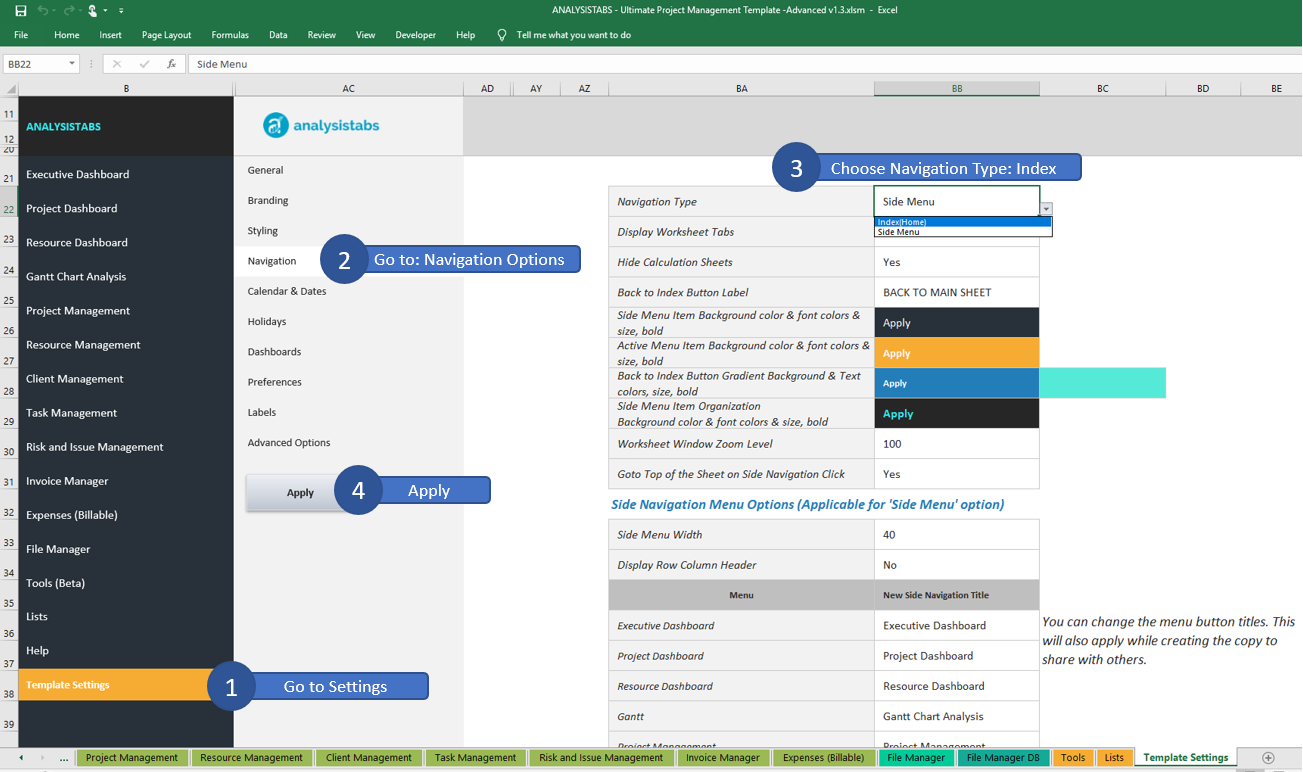
You can toggle the Side menu from Templates Settings. Please follow the below steps to hide the side menus in the worksheets.
- Goto Settings
- Goto Navigation Options
- Select the Navigation Type as Index(Home)
- And Apply the settings
Please see the below screen-shot for pictorial representation of the above settings:
Now , you can see the index page to navigate sheets. And Back to Mainsheet /Index sheet in all worksheets.
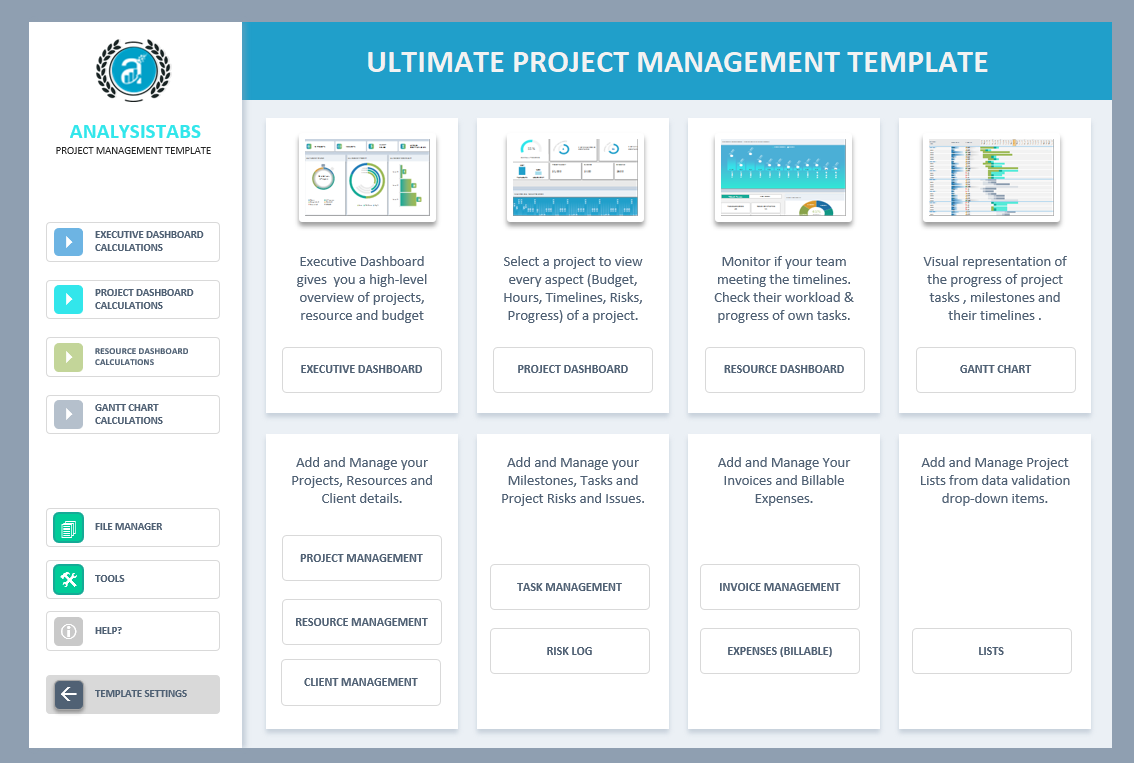
We are creating most of our Data Entry Tables using Excel Tables (List Objects) for better management and performance. Here are the key advantages of using Excel Tables (List Objects) for our data tables:
- It is easy to manage the data, fields and records
- Easy to manage formulas, Filtering Data
- Reduce the files size
- Improves the performance
Let us learn most useful tips to deal with Excel Tables.
Adding New Records:
We have several methods to add new records in Excel Tables. Please follow the below steps to add new rows in Excel Tables:
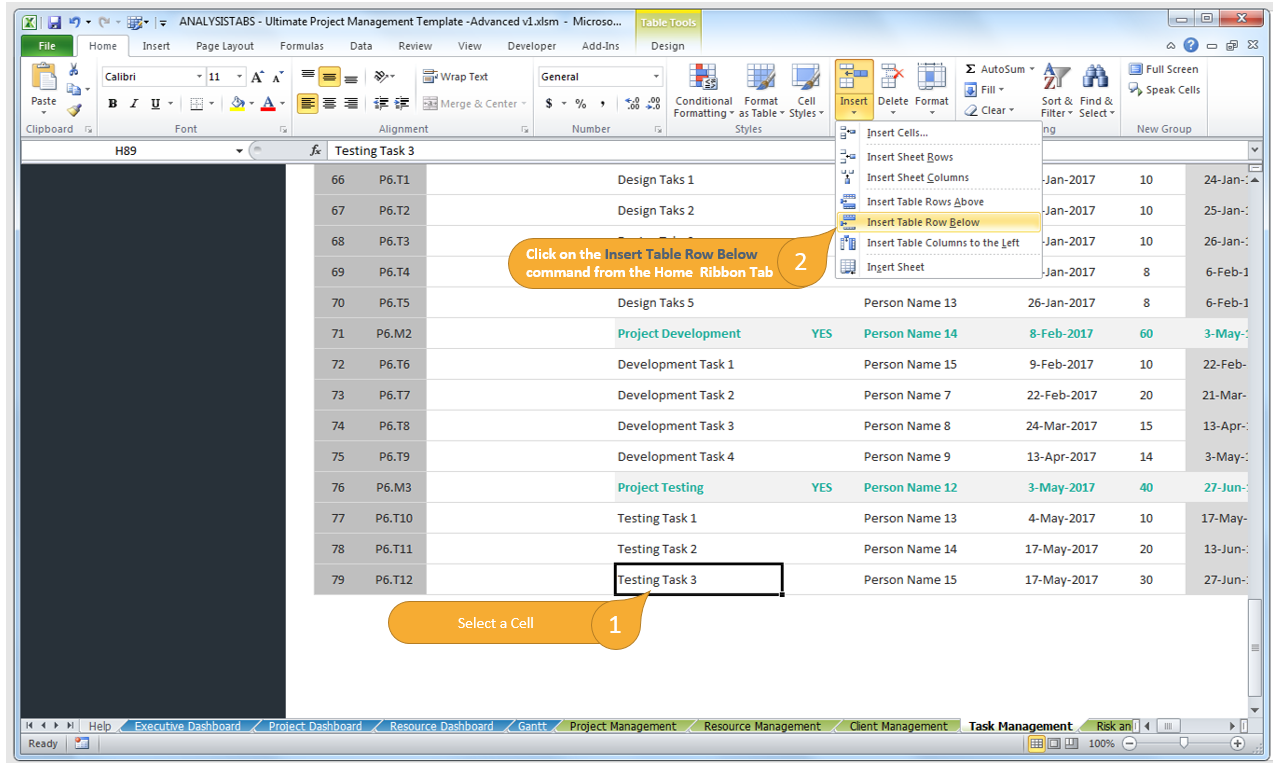
Method 1: Using Insert Table Row … command in the Home Tab -> Cells Group
- Select a Cell in the Table
- Go to Home Tab in the ribbon menu and View the Insert commands in the Cells Group
- And Click on the Insert Table Row … Command
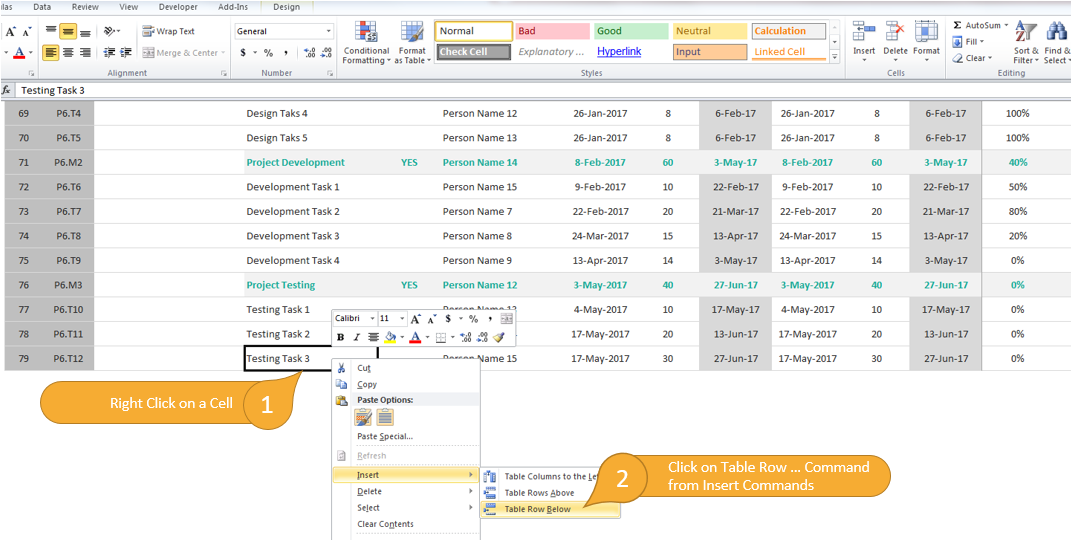
Method 2: Using Insert Command in the Right Click Menu
- Right Click on a Table Cell
- Click on Table Row … Command from Insert Commands
Method 3: Using Excel Shortcut Keys
We can use Excel Short cut to Insert Records. We need to select a Table Row then use the short cut key to insert new Rows:
Windows:
- Select Table Row: Use [Shift]+[Space bar]
- Insert Record: Press [Ctrl] and [+]
Mac:
- Select Table Row: Use [UP ARROW]+[Space bar]
- Insert Record: Press [^] and [I]
Deleting Records:
We have several methods to Delete records in Excel Tables. Please follow the below steps to add new rows in Excel Tables:
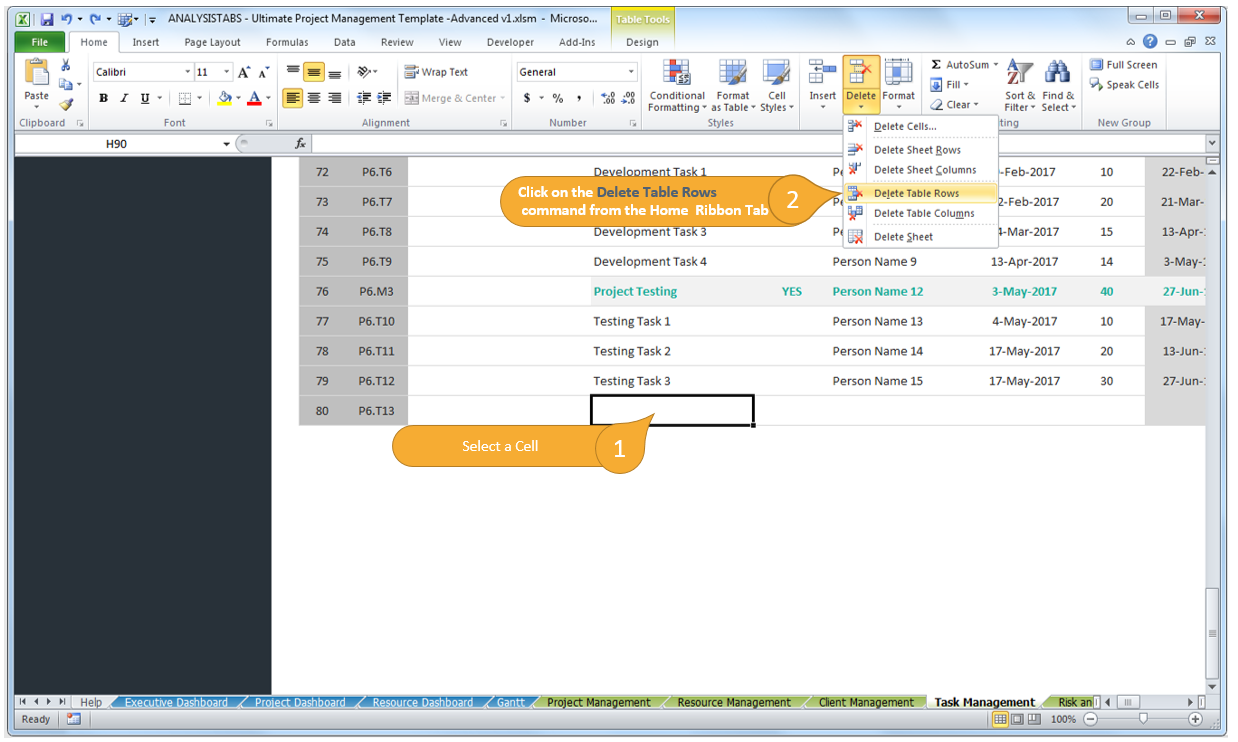
Method 1: Using Delete Table Rows … command in the Home Tab -> Cells Group
- Select a Cell in the Table
- Go to Home Tab in the ribbon menu and View Delete commands in the Cells Group
- And Click on the Delete Table Rows … Command
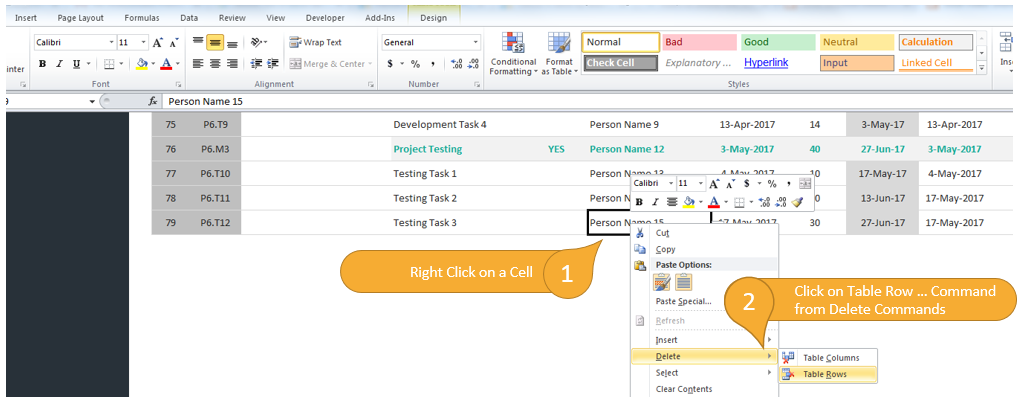
Method 2: Using Delete Command in the Right Click Menu
- Right Click on a Table Cell
- Click on Table Row … Command from Delete Commands
Method 3: Using Excel Shortcut Keys
We can use Excel Short cut to Delete Records. We need to select a Table Row then use the short cut key to Delete Rows:
Windows:
- Select Table Row: Use [Shift]+[Space bar]
- Insert Record: Press [Ctrl] and [-]
Mac:
- Select Table Row: Use [UP ARROW]+[Space bar]
- Insert Record: Press [^] and [-]
Adding / Deleting Rows in Ultimate Project Management Template -Advanced Version
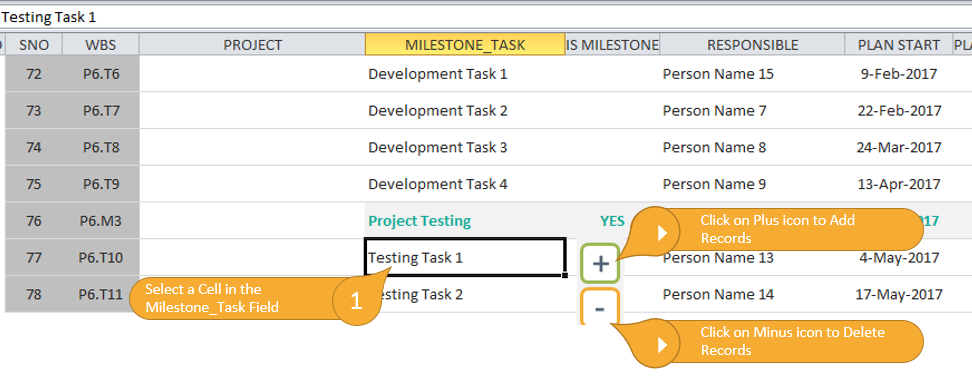
We have provided easy to use interface to add/delete rows in Data Sheet Table:
These controls are disabled by default, you can enable from settings:
Now you can click on any task/milestone to add/delete records:
You can change the currency symbols in the Data sheet using built-in formatting tools. You can select the required field to change and format it.
Let us see an example: We will change the Budget filed in Project Management sheet.
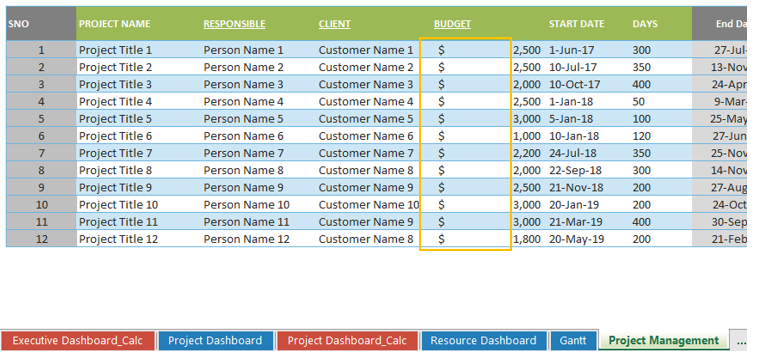
You can select the Filed Data Range and format using the Number formatting tool (You can right click and click on the Format Cells … command to view the number formatting tool.
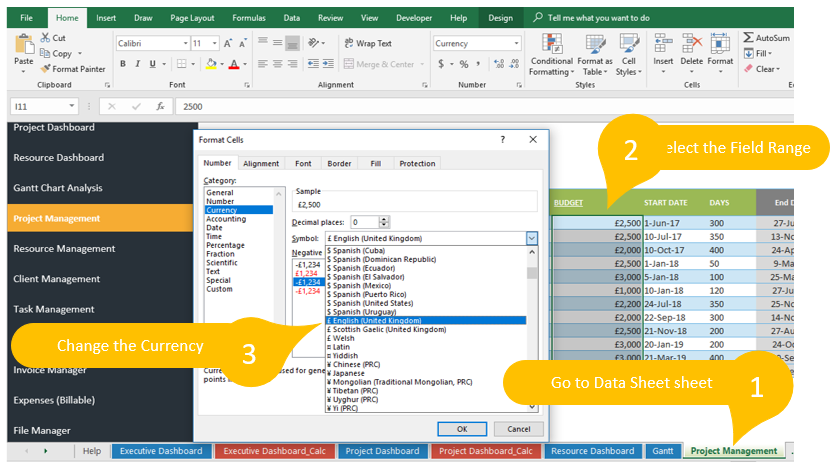
The default currency of our PM templates fields is set to USD ($). You can change this by using built-in Excel formatting Tools. You need to format the actual range in the calculation sheets.
Let us see few examples:
Changing the currency symbol of Budget in Executive Dashboard worksheet:
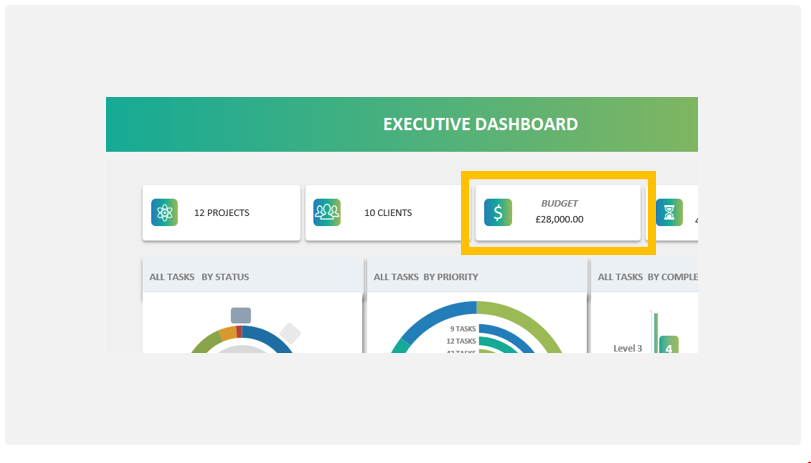
We can change the currency of the Budget figure. Currency is formatted as USD by default, let us change to UK pound.
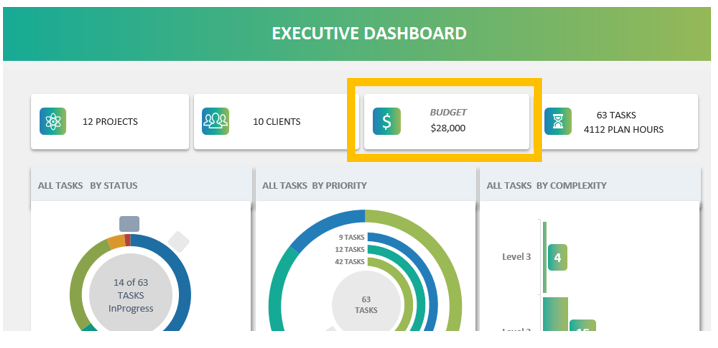
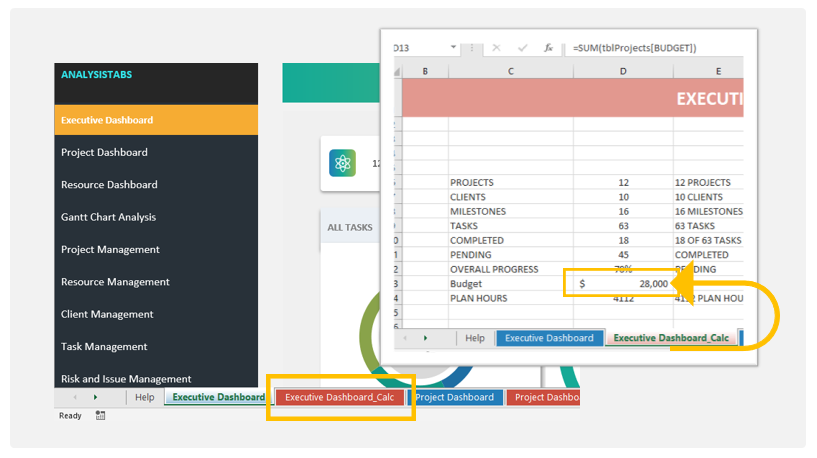
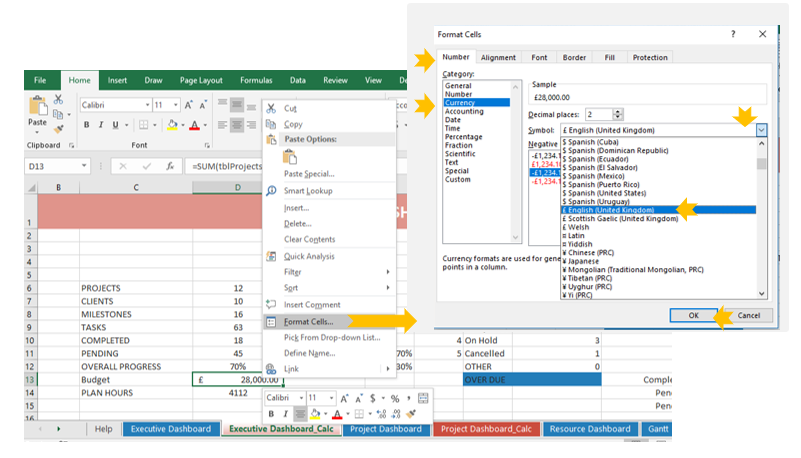
To change the currency, we need to format the actual range in the calculations sheet. In this case wee need to format the currency range in the Dashboard Calculations sheet. Go to the Executive Dashboard_Calc sheet. Un-hide the sheet if it is hidden (you can right click on the sheet tabs and unhide the sheet).
Now select the Budget value range/cell. And format the cell using built-in Currency Tools.
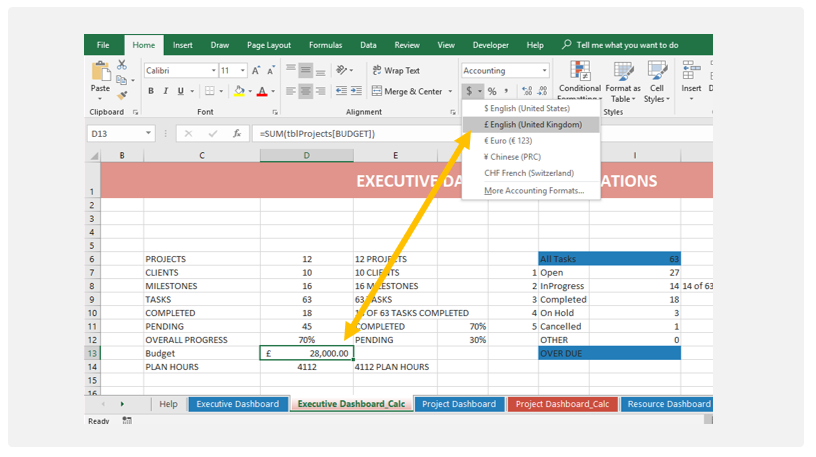
Alternatively, you can right click on the range and change the currency from number formatting tool:
Now, you can observe that the the currency is symbol is changed to UK Pound.
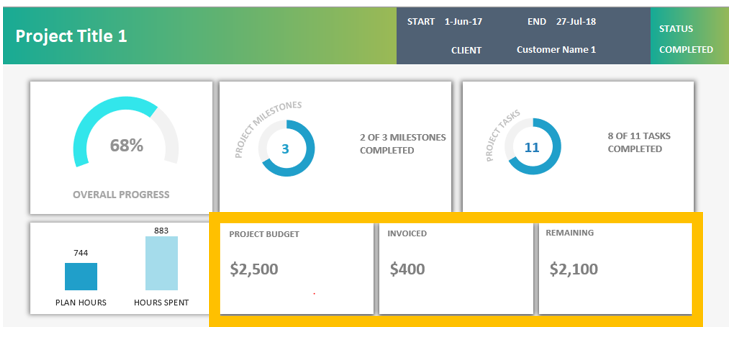
Changing the currency symbols in Project Dashboard worksheet:
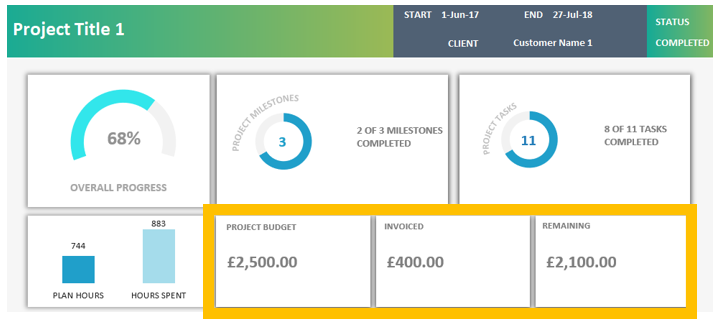
Here we can see that the default currency of the Project budget, Invoiced and Remaining is in USD. We can change this currency from the calculation sheet.
Go to Project Dashboard_Calc worksheet and format the currency range using built-in tools (as explained above)
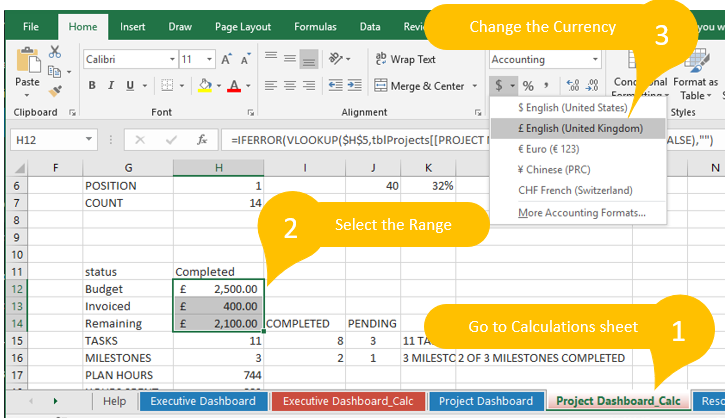
Now you can observe that the currency symbols in Project Dashboard sheets changed to UK Pound.
